In the previous guide, you learned which web hosting companies are recommended by WordPress.org. To refresh your memory, these are Bluehost, SiteGround, and Dreamhost.
Each web hosting company has its pros and cons, one may be better than the other in a particular aspect. But the most important thing to note is that you really can’t go wrong with any of these three hosts.
If you want to go web host shopping, you can try out each host for a short period of time as all three hosts offer money-back guarantees. Bluehost and Siteground offer 30 days while Dreamhost offers a 97-day money back guarantee.
Now, what’s really great about these three hosts is that they make it super easy for new WordPress users to get started on WordPress. A few years ago, you’d have to have some technical knowledge to be able to install WordPress on your website.
You’d have to download WordPress from WordPress.org and then upload it to your web host via FTP or file transfer protocol. But not anymore.
WordPress 1-click install is the easiest way to install the software on your website. As the name suggests, all you have to do is click a single button, wait a few minutes, and you’ll have a brand-new WordPress website!
But, is that really all there is to it?
Well, in a sense, yes. But you still have to fill out a few essential fields before you can install WordPress. Don’t worry, you don’t have to do anything technical, if you’re worried about that.
How To Do A 1-Click WordPress Installation:
Depending on your web hosting company, you may have a couple of different ways to do the 1-click install.
In this section of the guide, I will walk you through the methods of 1-click WordPress install on GrabBag Hosting. If you use another web host that offers this functionality, the user interface may appear different. But for the most part, however, the fields you need to fill out will be similar.
Installing via cPanel’s WordPress Tools section
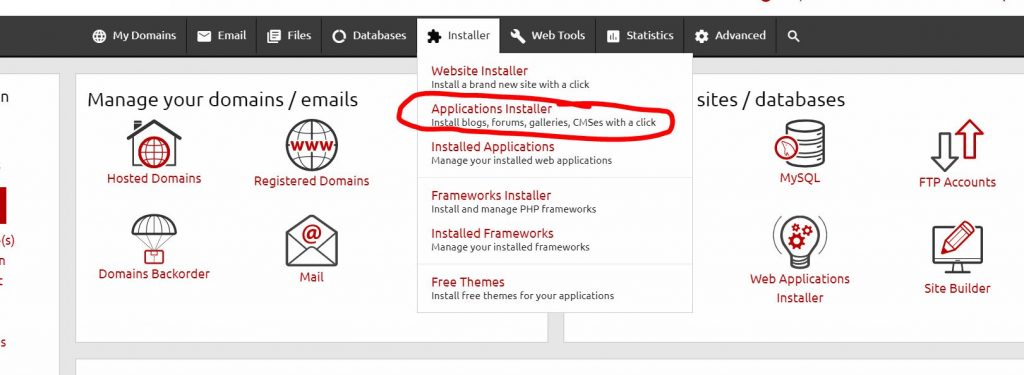
Once you’ve logged in to your web hosting’s cPanel, look for the WordPress Tools section. On GrabBag Hosting, you’ll find the link in the menu bar at the top of the page. Click on Installer and then go to the Applications Installer tab.
You will see this screen below:
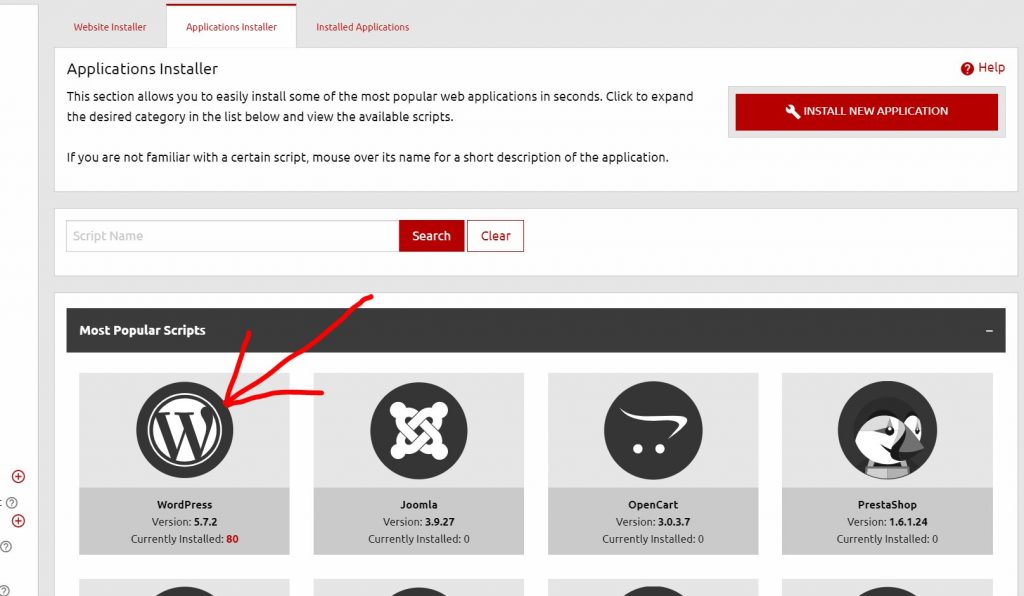
Next you need to select the type of application you would like to install on your domain. In this case it is wordpress, so select “WordPress”.
Next you will have a form pop up. This will allow you to enter all of the info for your 1-Click Install.
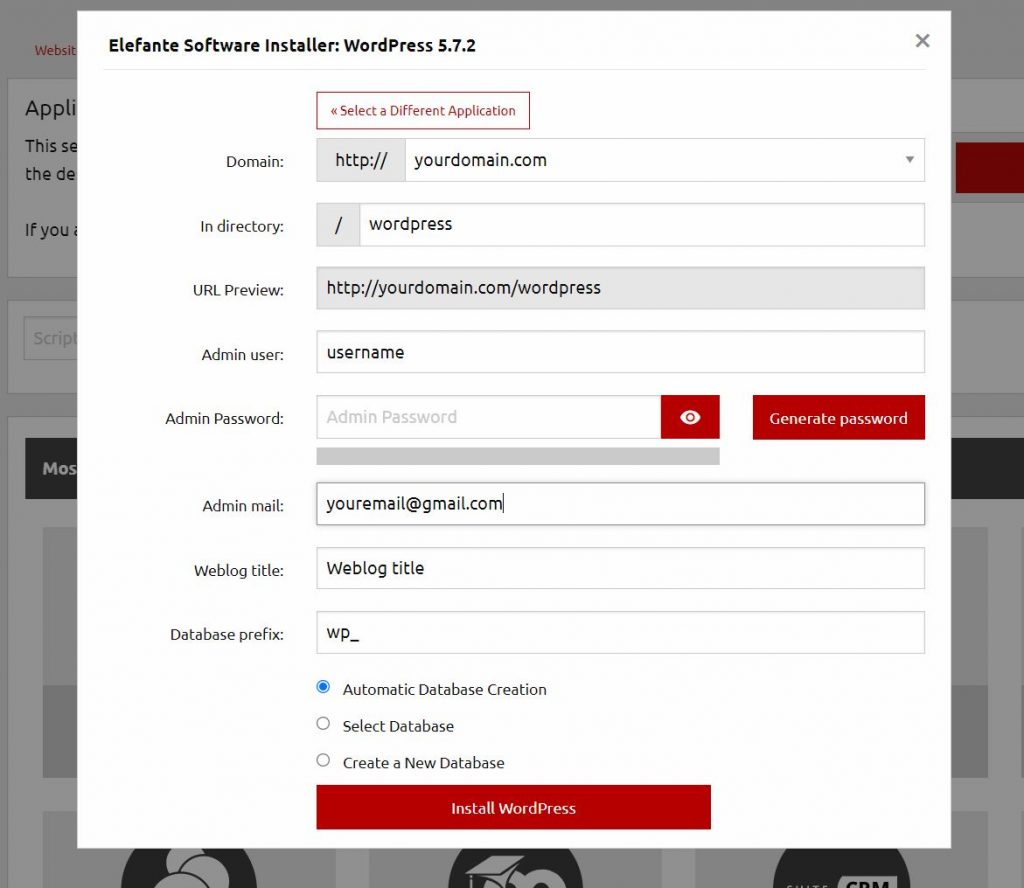
As you can see, the form is very straightforward. Here’s what you need to supply so you can successfully install WordPress:
- Domain – if you have more than one domain name in your account, you need to select the correct domain from the drop-down list. Otherwise, if you only have one, then it’s going to show up by default.
- Directory – leave blank if you want to install WordPress on your main or root domain. However, if you want to install on a sub-folder such as yourdomainname.com/blog or yourdomainname.com/news, then use either blog or news as the install Path.
- Admin Username – type in the username you want to use when you log in to your WordPress admin.
- Admin Password – type in the password you want to use for your WordPress site admin.
- Admin Email – type in the admin email you want to use for your WordPress website. It can be your custom domain email address, or your personal email address such as Gmail, Outlook or Yahoo.
- Site Title – type in the title for your website. You can always edit this later on in your WordPress admin. For now, you can just leave this blank or write something like, ‘My New Blog’ or ‘My New WordPress Website.’
Once you’ve filled out the required information, hit the Install WordPress button. In a few minutes, you will receive an email from your web host confirming the installation.
Also you will have a pop-up box giving you instructions and details about your new WordPress install.
What’s Next After Installing WordPress?
Your WordPress installation comes with a few dummy content and some pre-installed plugins. You need to delete most of this stuff. Let’s begin with the dummy content.
- Delete the dummy content
There are 3 dummy content that comes pre-published on your WordPress site. There’s a dummy page, a dummy post, and a dummy comment.
To delete the dummy page, navigate to the Pages section. You’ll see a single page there with the title ‘Sample Page.’ Hover your mouse over the title so the editing options will appear. Click on Trash to delete the dummy page.

To delete the dummy post, navigate to the Posts section. You will see a post with the title ‘Hello world!’ Hover your mouse over the title and delete the post.

To delete the dummy comment, go to the Comments section. You will see an approved comment from ‘A WordPress Commenter.’ Again, hover your mouse over the comment so the Trash button will appear. Click on Trash to delete the comment.

- Set up your WordPress site’s title and tagline
For branding purposes, it’s best to use your brand name as your site title. It will help make your brand more recognizable to your audience.
The tagline can be your brand’s motto. If you’ve got a motto already, then use that. If not, then come up with one as soon as possible. Just make sure it describes what your site is about.
For instance, if you’re a roofing company, then your site title can be something like ‘Johnny’s Roofing Services’ and your tagline can be ‘The best roofing company in South Los Angeles.’
Think about what’s relevant to your business and use that to come up with the perfect site title and tagline for your new WordPress website.
The site title and tagline appear on your visitor’s web browser when they land on your website. If you forget to change it, people will see the default WordPress site title (ss_site_title) and tagline (Just another WordPress site) which will make you look unprofessional.
Take a look at this screenshot. You can clearly see the site title and the tagline.

To edit this information, go to Settings > General and type in the new details. Now, look what happens when I change the site title and tagline to something else:

- Change your WordPress Permalinks
Permalinks are the hyperlinks that appear on your web browser. By default, WordPress uses the Day and Name permalink option as you can see in the screenshot below. To access this page, simply go to Settings > Permalinks.

Many WordPress website owners use the default format. However, if your content is more the evergreen type, people don’t necessarily need to know when your content was published, right?
For example, if you’ve got a website on training dogs, and you know that what you publish today will still be relevant next year or even 10 years later, then people don’t need to know the date it was published.
More often than not, people prefer to see fresh content. If they see your post is a few years old, they may not bother reading your content, no matter how awesome and valuable it is.
With that said, for evergreen types of content, there’s really no need to include the date in your permalinks. This is why it’s highly recommended you update your Permalink settings from ‘Day and name’ to ‘Post name.’
There are a couple of advantages as well when you use Post name as permalinks:
1. Your website visitors will know what your page or post is about.
2. It’s good for your website’s SEO.
3. It’s a great way to keep your content organized.
WordPress gives you a number of choices for your permalinks. In the end, you will have to decide what works best for your website and the type of content you publish.
- Uninstall unnecessary plugins
Your WordPress install probably came with a few pre-installed plugins. In our demo WordPress installation using Bluehost’s 1-click install option, a number of plugins were already present in the Plugins section as you can see below:
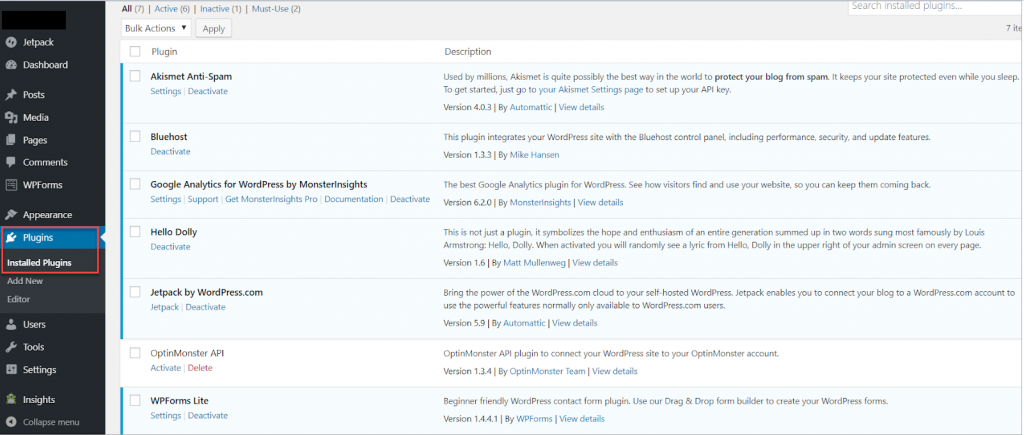
As much as possible, you want to use only the most essential plugins on your website. If you’ve got too many plugins running, you risk slowing down your website.
Some plugins could also conflict with other plugins, and cause problems on your site. Troubleshooting can be a headache especially if you’re a novice WordPress user.
For starters, you may want to delete the Hello Dolly plugin. It’s unnecessary and doesn’t really do anything for your website.
We’ll be covering website enhancing plugins in Guide No. 5 so we’re not going to go into too much detail about plugins here.
- Set your time zone
Setting your time zone is important because this is what your system will base on when you schedule posts to be published, or schedule a backup.
By default, the WordPress time zone is UTC+0. To change it to your local time zone, go to Settings > General. Scroll down a bit and you’ll see the Time zone settings.

Final Words
As you’ve learned in this guide, installing WordPress isn’t hard, but you have to at least know what you’re doing. 1-click WordPress installs have encouraged many web owners to try their hand at building their own WordPress website.
In the next guide, you’ll learn everything there is to know about WordPress themes and how you can go about choosing the perfect theme for your new website.