If you want your WordPress website to rank high in search engines, then you must practice on-site optimization. Before you start thinking this is way too complicated, let me just say that on-page and on-site optimization are simply ways to get your site and your web pages indexed and ranked faster on Google and other search engines.
Optimizing your site is important if you want highly qualified and free traffic from search engines. Who doesn’t want that, right?
Even if you plan on using paid advertisements to give your site an initial traffic boost, you should still optimize your site so that once it’s out of the Google ‘sandbox’ then your site is primed and ready to receive search engine traffic.
If you’ve never heard of the ‘Google sandbox’ it’s basically a theory that’s been going around in SEO communities for a couple of years now. The theory is that Google puts new websites (usually 6 months or less) on probation.
No matter how good your content is, or how many backlinks you get from good sites, if it’s a new site, you don’t get anywhere near the first page for any keyword.
After the so-called sandbox period, most websites experience an influx of free traffic from Google, as attested to by their Google Analytics data.
Now, that you know what the sandbox is, let’s move on to the next section, so your site is prepped and ready when it finally gets out of the sandbox!
Top 7 Ways To Optimize Your WordPress Website
Optimizing your website is a tad difficult, at first. You probably just want to start publishing your content and getting your website in front of as many people as possible.
But, I promise that when you finally see the many benefits of having a well-optimized website, you’ll thank yourself for taking the time to learn all these methods. Let’s begin!
1. Use a fast loading WordPress theme
Google loves fast websites. And so do your site visitors. You have to admit that even you yourself can get impatient with slow-loading websites.
The speed of WordPress themes varies wildly. Some may be poorly coded that it adds unnecessary weight to web pages, while others are lighting fast. I’m not saying premium themes are inherently fast, but most of them are optimized for speed.
If you’re willing to shell out a few bucks for a premium well-coded theme, consider the Genesis Framework from StudioPress (https://my.studiopress.com/themes/genesis). It’s one of the most highly recommended fast-loading themes among WordPress users.
Also, if your website visitors are mostly viewing your website on a mobile device, you should consider using the plugin AMP for WordPress (https://wordpress.org/plugins/amp).
AMP stands for Accelerated Mobile Pages, it’s an open source project that aims to provide content that’s optimized for mobile devices. If you’ve ever been on a WordPress website that loaded instantly, then that site was probably using an AMP plugin.
2. Install a caching plugin
Everytime someone visits your website, your web server sends over your website files to your visitor’s computer. With the help of a caching plugin, your server gets to take a break from sending all those files.
How? Well, a caching plugin generates static HTML files, which have a smaller file size than your regular website files, and sends it to your visitor. This makes your website load faster on your visitor’s browser which, in turn, helps leave a positive impression on your visitor. As you probably already know, a fast-loading website encourages repeat visits.
In Guide No. 5, I recommended you install the caching plugin, WP Super Cache, to help speed up your site. There are other caching plugins available, both free and premium, and it’s really up to you which plugin you’ll choose to install.
Check out the reviews and the feedback from other users, so you’ll know if it’s the right plugin for your website.
3. Make sure your site is visible to search engines
Months after you launched your website, well outside the normal Google sandbox period, you start wondering why no one still visits your site. You’ve published highly valuable content, but no one’s reading it.
If you don’t want to run into this problem in the future, then you need to make sure you make your site visible to search engines. When your site is brand new, and you don’t have any content up, then you don’t need to make your website visible to search engines yet.
However, once you’ve added content and you’re ready to receive some traffic, then head on over to Settings > Reading > Search Engine Visibility.
Make sure to untick the box ‘Discourage search engines from indexing this site.’
Here’s a screenshot:

Lastly, don’t forget to hit the ‘Save Changes’ button for your changes to take effect.
4. Add a sitemap
Having an XML sitemap is good for your website’s SEO. A sitemap is quite literally a map of all important pages on your website. When search engines crawl your website, they can easily access all the other important pages on your website.
There are plenty of XML sitemap plugins available on the WordPress Plugin Directory, including dedicated sitemap plugins. But for starters, I recommend you use Yoast SEO plugin. This is a very powerful plugin and installing it on your website helps get your SEO in order.
To use the XML sitemap feature on Yoast, all you have to do is go to SEO > General > Features, and then scroll down a bit to where it says XML Sitemaps. Click on On to activate this feature.
Here’s a screenshot:
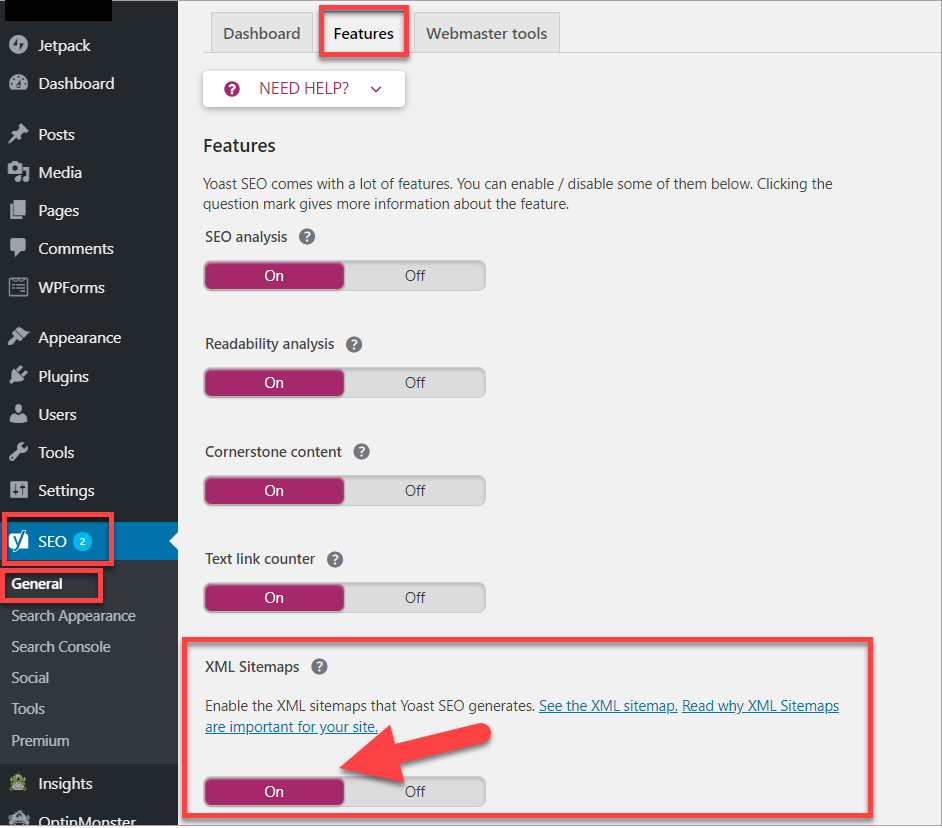
At the bottom of the page, don’t forget to hit the blue ‘Save’ button to save your changes.
If you want to see how your XML sitemap looks, you can click on the link (please refer to screenshot) that says ‘See the XML sitemap.’
Instead of waiting for Google to find your sitemap, which can take a while if your site is new, you can take the proactive route and add your sitemap to the Google Search Console. Doing so allows Google to crawl your web pages and posts. If there are errors in the sitemap, you will know about it right away.
5. Use readable and SEO-friendly permalinks
Readable hyperlinks are those that tell you exactly what the content is all about. For example, if your domain name is yourawesomewebsite.com and you’ve got a post about why SEO is important, then the permalink should be something like this:
Yourawesomewebsite.com/why-SEO-is-important, or
Yourawesomewebsite.com/importance-of-SEO
Just by looking at the link, you can already tell what the content of the page is going to be all about, right? Now, how about if your links look something like this:
Yourawesomewebsite.com/archives/12345, or
Yourawesomewebsite.com/?p=12345
These links don’t really mean anything, and it’s impossible for you to guess what the content is.
Well, guess what? Google doesn’t like these kinds of links either which is why if you want to optimize your website, then you better make sure you’re using the correct format for your permalinks.
In Guide 3, I already showed you how you to change your permalink settings. To recap, click on Settings > Permalinks, then choose Post name as you can see in the screenshot below:

What’s important to mention here is that once your content is already a few months old, and your pages are already appearing on Google, then you need to be careful when you change your permalink structure.
You’ll need to redirect the old links to the new links so you don’t lose your existing SEO ranking. Redirecting links can get quite complicated, so it may be best if you hire an SEO professional to make sure you don’t destroy your site by accident.
6. Use categories and tags properly in WordPress
Categories and tags may sound like they’re the same, but they’re two separate entities on WordPress. Categories are broad groupings of the content on your website.
For example, if you have a blog on dogs, then you may use the dog breed as a category on your blog.
For tags, you can use that to describe what a particular post is about. So, if you’ve got a blog post about raising American Cocker Spaniels, then your category would probably be Cocker Spaniels, and your tags would be cocker spaniel, walking a cocker spaniel, feeding a cocker spaniel, etc.
7. Install a good SEO plugin to take care of your on-site SEO
I’ve already mentioned Yoast SEO in this guide, but I’ll mention it again. Yoast is really one of the best SEO plugins for WordPress.
In addition to the XML Sitemap feature we mentioned in point number 4, you can also activate the following features on Yoast:
- SEO Analysis. This helps you write content that search engines love. You’ll have to enter a ‘focus keyword’ which is the main keyword you’re hoping to rank for.
Yoast will give you suggestions on how you can improve your content. All suggestions happen in real time so the moment you edit your content and address the problems Yoast point out, then it’s going to disappear from the list of Problems or Improvements.
Take a look at this screenshot:

Check the points listed in the Good section. You’ll notice Yoast keeps track of your keyword density, your meta description, focus keyword, your images’ SEO, the length of your content, inbound and outbound links, and more.
Yoast’s SEO Analysis feature also allows you to view a snippet of how your page will look like in Google’s search results.
You can edit the SEO title, the URL slug, and the meta description.

As you can see in the screenshot, the SEO Title and Meta Description are showing green which means it’s SEO optimized.
However, at the top right where it says Keyword: test, it shows the orange color which means the content isn’t SEO optimized yet. The goal here is to get a green light so keep this in mind when you write your content.
- Readability Analysis. This tool helps you improve the structure and style of your content. Here is an example Readability Analysis by Yoast.

As you can see, the Readability tab has a red color which means the content needs to be improved. To get a green light, all you have to do is fix the issues listed in Problems and Improvements.
Yoast even makes it easy for you to locate the problem areas – simply click on the eye icon to have the text highlighted.
- Cornerstone Content. You can identify which of your pages or posts are cornerstone content. If you mark a page as cornerstone, then Yoast will help you build links to other pages on your website. To mark a specific page or post as cornerstone content, simply go to the Focus Keyword section, then tick the box ‘This article is cornerstone content.’

- Text link counter. Yoast’s text link counter helps improve your site structure by showing you how many internal links you’ve put in your post (outbound links) as well as the number of internal links to your post (inbound links).
This tool isn’t just great for helping with your site’s SEO, it also helps your site visitors to browse other relevant pages within your website. This helps encourage people to stay on your site longer which is also good for your site’s SEO.
- Ryte integration. To make sure your site is still indexable by search engines, activate this feature. Ryte will check your site on a weekly basis. If there’s a problem with your site’s indexing, then you’ll get a notification on your WordPress dashboard as well as your email.
Final Words
Optimizing your WordPress website will take a lot of work, and until you finally see your website climbing up the search engine pages, it will feel like you’ve got nothing to show for it. Don’t give up. Continue optimizing your website, and you’ll reap the benefits later!